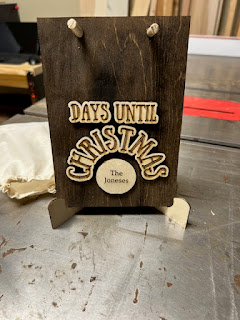
So, in early November we had an idea. Why not try to make a Christmas countdown on our laser? It would be easy. We could post it on our Etsy shop and people might even want to buy it!
Well, first of all, it wasn't easy. And second of all, we never did get it right until it was too late to post it on our Etsy shop this year. No one wants to buy a countdown calendar after the countdown is supposed to have started.
We finally did get it right though, so look out for it next year! Here's the process we went through and what we ended up with. Hopefully it will be of help to you in your own maker process.
We started with the premise that we wanted something colorful and Christmassy and also easy to use. Then we asked ourselves, what could a laser calendar be that other calendars couldn't?
Our first iteration wasn't too bad. We spray painted the back board green, and the wood for the numbers white. The "Days Until" was burned in and the "Christmas" was cut out and super glued on. The problem with this was the green spray paint looked okay, but not great. Also, we cut the holes for the dowels at the top the wrong size so we had to shave the dowels down to make them fit. Gluing the "Christmas" on wasn't too hard, but it was a little finicky. Also, we loved the ornament we burned into the bottom center and thought that would be a good place for personalization.
The other issue was how we were going to get this guy to stand up. We tried one of the stands we use for some of our other products. Just slide the board into the stand. This was okay, but the sign just seemed too upright. We wanted it to lean a little. We also wanted storage for the hanging numbers.
Enter the box! Next we tried to make a box stand for the calendar. The box is one we already use for the dice towers we make. We just had to resize it.
We had much more success with this stand that we use for some of the signs we sell. It's an easel-type stand that can pack flat and the tilt was just right for the calendar.


.png)
.png)


.png)


.jpg)
No comments:
Post a Comment