Wednesday, July 31, 2024

National Friendship Day: How to Be a Good Friend

National Friendship Day may have started as a suggestion from Hallmark, but whether or not you send a card, the first Sunday of August is a special day to recognize friends.


More than 90 percent of Americans say they have at least one close friend (npr.org). And having friends has lots of advantages. Studies say people who spend time with friends live longer, are healthier mentally and physically, and are more successful in their careers. 

Having friends is great, but so is being a friend. If you're looking for ways to be a good friend, "The Ten Action Steps to Becoming a Good Friend" (https://www.scienceofpeople.com/good-friend) is a great place to start looking for ideas.

Our top three suggestions for being a good friend are:

1. Take the Time

Do something fun together. Put the phone down and listen. Help them accomplish a task they need to get done. Do your best to be there for them when they need you. If you don't have a lot of time, think quality, not quantity.

2. Be Trustworthy

Keep confidences. Listen with more love and less judgement. Tell the truth and be loyal. Be supportive and kind.

3. Communicate

If you can't do it in person, now's the time to pick up your phone. Give honest feedback. Let them know they are important through your words and actions. Be a good listener.


Friendship matters. This Friendship Day, try one of our tips and see if it works!

Thursday, July 25, 2024

Throw a Fancy French Olympics Party

We are generally not into "fancy" around our woodshop, but the Paris 2024 Olympic Games seem like a good opportunity to branch out.

There are lots of ideas out there on how to throw a fun Olympics party at work or for children, but we thought some more elegant ideas for grown ups would be nice.

First. The invitations.

You could do an Olympic themed invitation or be sport specific. What are you going to watch? Fencing? Rowing? Cycling? Tailor your invitation.


Next. The menu.

Traditional French fare would be ideal. Some simple hors d'oeuvres you could try:

Gougères -- Petite cheese pastry puffs. Try the recipe at https://www.seriouseats.com/gougeres

Canapés -- These are little toasted bread slices with delicious toppings. We like the ideas at https://preppykitchen.com/easy-canape/

Olive Tapenade -- A spread or dip made with olives, capers, and anchovies. You can skip the anchovies if you want.  https://thegoodlifefrance.com/how-to-make-tapenade-at-home/


The Decor.

A Parisian theme with Eiffel Towers. A sport-specific theme of your choice. Or a theme featuring the various countries you and your friends or family members are cheering for. All these could be made a little classier with upscaled decor. Throw in a touch of gold to represent the medals.


And finally, Games and Prizes.

There's nothing wrong with minute-to-win-it games, but if you want something a little classier, try these competitions. You can DIY awards or order some online to match your theme. (We have a free medals SVG download on our Etsy shop.)

The Name Game: Tape various name of famous athletes on your guest's backs. Have them try to guess who is on their back by talking to others and asking yes/no questions. This is great if not all your guests know each other yet.

Something Sporty: If you're not just a watcher but a doer. Enjoy some real competition along with your watch party. Play darts or pool. Have a pushup competition. Play croquet or lawn darts.

Go for the Gold: It's a little pricier and more physical, but you could rent archery equipment or set up a badminton or volleyball net. (If you're more into watching and less into playing, there's always Scrabble. Extra points for sporty words.)

French Games: Be adventurous and try some traditional French games, like Escargot, a version of hopscotch. Find descriptions and instructions at https://www.fluentu.com/blog/french/traditional-french-games/

Medals are always great for prizes. You can make them standard 1st, 2nd, and 3rd place, or personalize them for a laugh. Candy or a goody bag also make good prizes.


Last of all, root for your athletes together! These athletes are amazing no matter what country they are from. Enjoy your the next few days of watching! 

Tuesday, July 16, 2024

Beryl and Bison and Bobcat

Most of you probably already know Houston was in a sad state after Hurricane Beryl last week. It was only a Category 1 hurricane, and you'd think we'd be used to storms by now, but it seems our power grid was caught unprepared. We lost power shortly after the storm started on Monday and didn't get it back until late Friday night. 

No power means no lasers, and no lasers means no work gets done around here. You don't realize how much you use electricity until it's gone. No laptops for designing, no WiFi for research, and worst of all, no power tools!

Trees and fences were down everywhere. This is a photo of our neighbor's house around the corner. Traffic signals were all out, some hanging by wires over the road. Even now, not all the stoplights are working.


While we were ready for a power outage with our small generator, flashlights, and food and water storage, we were not ready for the heat! Our home was sweltering. You know it's bad when you have to go outside to cool down in Houston. We are so grateful we were prepared to plug in our fridge and a few fans. And when that wasn't enough, we were able to evacuate to Austin to stay with family for a couple of days. We are also grateful our fence and house are all intact. 

Now that we're back, we're trying to help with clean up in our area. What we've learned and been reminded of is that it's important to be prepared and that it's important to look out for your neighbors. Our neighborhood and church families were all checking up on their members. We would have been in the dark without flashlights and batteries, we wouldn't have been able to cook if we had an electric stove, we would have lost all the food in our fridge, if we hadn't been at least a little prepared.

So, if you're in a place where you get storms or power outages, which is pretty much anywhere, it's a good idea to get ready now for a no-electricity or no-water scenario. We promise, you won't be sorry you did. 

Here are some websites with good resources. 

https://www.ready.gov/plan

https://www.cdc.gov/hurricanes/safety

https://www.redcross.org/get-help/how-to-prepare-for-emergencies.html

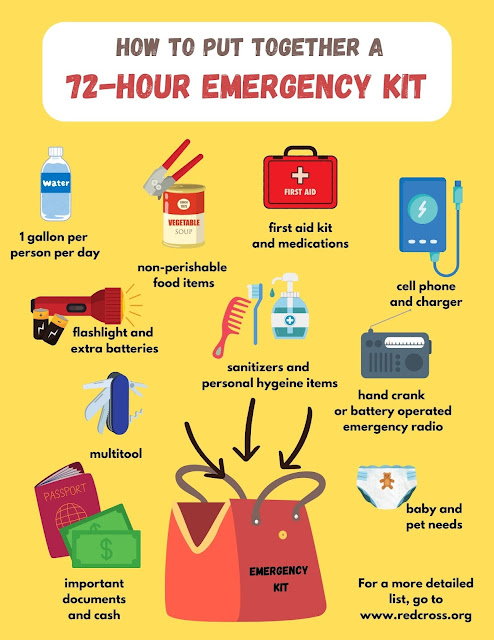
A 72-hour kit is a fantastic place to start. Here are a few tips on what to include in your kit.


Monday, July 1, 2024

Tiny Tins for Summer Road Trips


It's time for the annual summer road trip. An American institution. 

You have the car seats, the stroller, the snacks, and the luggage piled so high you can barely see out the back window. The kids haven't even started asking if they're there yet. But you know they will. And soon.

Whether you're headed to Pasadena or Portland, kids need something to keep them occupied on those long summer road trips. We've tried lots of things with our kids: the alphabet game, the license plate game, the banana game. (We yell, "Banana!" at the top of our lungs whenever we see a yellow car, and we keep score.)

Over the years we've found lots of ideas we love. The kid's favorite is when we specially prepare individual paper bags for them to open at intervals along the way. The bag contents are a surprise: candy, a toy, a joke, stickers, or a book, depending on the child.

Lately, even though our kids are older now, we've discovered Altoid tin play sets. We love them! And our little nieces and nephews do to.

You can use any sort of similar tin, and the play sets can be any thing from simple and easy to artistic and complex. Have a look online for ideas your kids might love. Lego filled tins are popular with my children. Just put a variety of pieces in the tin and let them create. This might only buy you a half an hour or so of entertainment, but it's better than nothing!

This tutorial from Instructables.com has you glue a Lego base to the lid as a foundation for your little builders.


Another idea is to fill your tin with paper doll supplies. The tins are metal, so magnets work great for holding dresses and shoes onto dolls. Here is an idea from Thismamamakesstuff.com.


Honestly, you can fill these tins with anything your child loves: tiny dinosaurs from the dollar store, finger puppets, cars, or magnetic poetry words.

We love these tiny tin ideas so much, we made a couple of our own and have a few more in development just waiting to be laser cut and put in a cute little tin. I love fairies and my husband loves tools, so those are the first two sets we've made.


We wish you all the best with keeping your kids (and yourself) happy on your summer road trips! Safe travels!

Tuesday, June 25, 2024

"I Hope They Call Me on a Mission"

 At church, our kids sing a song that goes, "I hope they call me on a mission! When I have grown a foot or two!"

It appears our oldest son has grown a foot or two (or maybe three. He is really tall.) He's planning to start a two-year mission for The Church of Jesus Christ of Latter-day Saints in a few months. And while we are sad he won't be with us, we are proud he has chosen to serve the Lord and others wherever he goes.

When missionaries leave, their local congregation usually hang a plaque with their photo on the wall of the church building. This week, we've been working on making our own version of those plaques, and we're pretty happy with how they turned out for our fictional Elder and Sister.


Soon we will be making one for our oldest. So if you see a really tall, really good-looking missionary named Elder Butler sometime in the future, please take really good care of him for us. We really appreciate it.

Here are a few good ways to support missionaries:

* Stay in contact! Missionaries love getting emails, cards, or letters.

* Be encouraging. Missions can be hard. Let your missionaries know you believe in them.

* Feed them. If you have missionaries in your area, be kind. Invite them over for dinner.

* Suggest service opportunities for them. Missionaries are always looking for ways to serve others.

* Find friends for them to teach. A missionary's main focus is teaching about Jesus Christ, and they are always looking for opportunities to do that.

* Donate to your congregation's missionary fund.

Have any more good ideas on how to support missionaries? Let us know in the comments.

Monday, June 17, 2024

10 Good Ways to Kill Your Plants


This week we thought we'd post about something we are real experts on. Killing plants.

There are two growing seasons in Houston and we have not been successful in raising a garden, (or sometimes even just grass) in either of them. Seriously, the people at Lowe's garden center hide the herbs behind their backs when they see us walking in.

So, in honor of the searing hot days between the two Houston growing seasons, we present to you our top ten ways to kill your plants.

10. Forget to water them. Plants need water. Who knew?

9. Over water them because you forgot to water them for so long. They don't like that.

8. Plant them in the wrong season. There are lots of online calendars to help you, but so far we haven't found one that works.

7. Experience a "big freeze." Even when you coax those little seedlings to life indoors, as soon as you transplant them, you can count on one of those cold snaps to frost your crops.

6. Don't believe in chinch bugs. When we moved to Texas we thought people were sending us on a snipe hunt when they said our grass was dying because of chinch bugs. Chinch bugs are real.

5. Plant the same things you used to plant in other states and expect them to do well. Texas is a law unto itself, even for gardening.

4. Grow herbs indoors without a suitable environment. They need enough sun and don't like air conditioning, unlike their human counterparts.

3. Plant your tomatoes in the spring so they can shrivel and die in the heat of summer. Experts say the hottest part of summer is when the planting should be and then you'll (theoretically) have a great tomato crop in the fall.

2. Grow basil they said. Basil loves the heat, they said. 

1. Go away on vacation for a week to escape the surface-of-the-sun temperatures. We guarantee you won't have a living plant left if you do.

On a happier note, we have found that our banana trees grow like weeds. They've been through hurricanes, freezes, heat spells, and our son with the weed whacker, and they keep coming back! One day, we might even get a banana off of them!

Happy gardening!

Tuesday, June 4, 2024

How to Make a 3D Wood Sign With Your Laser Engraver

As an owner of an Etsy Shop that has run out of projects of your own to make, getting an order to make a sign creates an exciting rush of adrenaline, but it is just the start of the long process to make a laser engraved wood sign. Outlined below is the process we went through on a fun order we had recently.

Step 1 - Find out what vision the customer has for the sign, and create a mockup in the computer to make sure it is exactly what they are looking for before building anything.


Step 2: Find the wood that we will use to make the sign.  Since we like to use upcycled or reclaimed wood in as many of our projects as we can. This often starts with scouring neighborhoods, marketplaces, or any other places that people like to get rid of things they don’t need anymore, tearing the wood down to its pieces, and then prepping it to make it look like a usable board again.  For this project we had a leftover piece of mahogany from another project.


Step 3: Get the board into shape needed for this sign. For this sign, that meant planing the wood to the correct thickness, cutting the piece of wood we had into three pieces and then gluing them back together to make a square.


Step 4: Laser work. Cut out the letters, and laser engrave the sign onto the prepared piece of wood.  This step is pretty self-explanatory.


Step 5: Finish the laser cut/engraved pieces.  For this sign that meant painting the 3D letters we had cut out, cutting the sign into its final shape (a circle), sanding the edges to make it look cool, and finally putting a keyhole hanger on the back to make the sign easy to hang on a wall.


Step 6: Assemble and Finish the Sign.  For a 3D sign that means gluing all the letters to the sign and putting on the final coat of polyurethane.  This is always the most exciting part of the process for me because you finally get to see the sign take its final shape after all the work.


Step 7: Take an awesome picture of the final product and enjoy it for a few minutes before remembering you made it for someone else. Then get excited to send it to them so they can enjoy it as much as you do.