Monday, September 23, 2024

Personalized Entertaining for a Crowd

If you like to plan ahead, then you're already thinking about family and friends visiting for the holidays and wondering how you are going to feed and entertain them. 

When our family and friends visit, we like to make them feel special with personalized or custom experiences when we can. (Some years we are just happy if we don't burn the turkey!)

One year we got matching plastic Christmas cups from Target and used our Cricut to cut out vinyl names. It wasn't expensive, but each little cousin had their own cup with their name on it, and they thought it was awesome. Plus, it saved a lot of washing up. 

For a classier option, try mugs or glasses with names.


One of our favorite wood lasered crafts we've made for Thanksgiving dinner is personalized napkin rings. These are something we use year after year. They function as napkin holders and place cards. 


If your family and friends are staying for an extended time, a personalized pillowcase would look great on their bed (or air mattress.) If you don't sew, don't worry. Amazon has got your back.


For reunions, T-shirts might be the way to go. Assuming you know everyone's size.

We have a fairly large extended family, so one year we got draw string bags for everyone at the reunion--no sizes necessary. We later personalized the bags with names written nicely in permanent marker.


Let us know what special things you decide to do for your family in the upcoming holiday season in the comments section! 

Tuesday, September 17, 2024

Easy Black Flame Candle and Sign

This candle, similar to one from Disney's Hocus Pocus cost about $6 to make and took about half an hour. We started with a simple flameless candle from Walmart ($5). If you've seen Hocus Pocus, you know that the Black Flame Candle isn't actually black. It's cream colored with designs on it. The flame is black. 


If you end up making this with a real candle, we advise you not to light it. You never know what will happen.

We found this excellent art on Pinterest and changed the color of the drawings to be more similar to the dark red color from the movie. Find the original post at  https://www.playpartyplan.com/hocus-pocus-candle/.


After printing it on sticker paper, we used a clear sheet of vinyl on the front of the sticker paper to make it more durable. We used this kind of vinyl. It's the same kind we use to coat our sticker sheets, and it works quite well, even outdoors.


The next step was burning real candles. We used two little votives and poured the melted wax from them down the sides of our flameless candle to make it look more realistic.


And there you go! Just like magic!

To go with the candle, we also made a sign. In the movie, Max reads the sign out loud. Even though you can't really see the sign in the movie, we imagine it looked something like this. Lightburn is our design tool of choice when we are using our wood laser.


We laser burned the sign onto 3mm cherry plywood, and then glued it to a piece of scrap wood from an earlier project to make it look more like a museum sign. Some Danish oil gave the plywood a nice finish.

Next step, put our candle and sign on display for Halloween next month!


Monday, September 9, 2024

One Download, Three Halloween Crafts for Kids

If you clicked the link for the free download, it's at the bottom of this blog post. If you want to see the cool things you can make with the download, keep reading.

We used our x-Tool laser to cut our Halloween shapes out of wood. It would be just as easy to cut them out of felt or paper on a Cricut or other similar machine. If you're really dextrous, you can print the file up and use scissors!


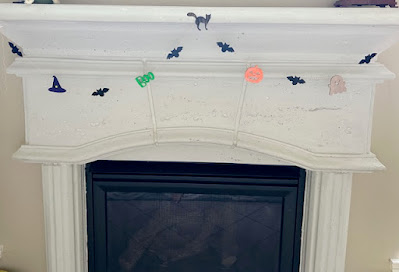
For our first project, we painted the ghost, boo, pumpkin, witch hat, cat, and bat, and turned them into a garland for a mantle. We used used craft paint, and the pieces are just taped to the string with small strips of duct tape.


We added some extra bats between each shape.


Our second simple craft was a bat mobile! Not the drivable kind.

We used the Happy Halloween sign and the same string from the first project (which came from the dollar store) to hang bats from the spiderweb. 


We kind of cheated for the third craft, because we already had a frame, but if you have an extra frame lying around, you can do this too. Put a photo of your child in a frame and have them decorate it with paper, wood, or felt Halloween shapes. If you print the shapes out, the kids can do all the coloring themselves.


As promised, here are the downloadable freebies. Enjoy!

If you would like actual wood pieces, you can order them from our Etsy shop at  

https://bisonandbobcatstudio.etsy.com/listing/1776330372


Monday, September 2, 2024

Mini Haunted House DIY

This mini haunted house would be a cute addition to anyone's Halloween decor. It is made from just one 12"x12" piece of 3mm plywood and cut out on our x-Tool diode laser.


We started with a simple house cut plan that we downloaded from another Etsy shop owner. Then we added our own Halloweeny elements in LightBurn, swapping out a moon and a cat for windows and adding some bats as well. We also added a "Happy Halloween" message to the roof along with some magical stars.

All in all, it was a fun, quick Halloween luminary. We decided to stick with the natural wood, but you could certainly paint it if you wanted to. We will probably make more and paint those!

The only kind of hard part about building this house was supergluing the pieces together. Having two people gluing would solve that problem, and result in less sticky fingers.


The base and roof were not attached to the house walls to make it easier to put a candle inside. We used a real candle, but it was quickly evident that an LED candle would have been a much better idea. Fire + wood = Halloween hazard.

It looked so good and spooky in the dark. Can't wait to make another one. Maybe we will change the shapes and put a "BOO!" on the roof this time. There are so many fun possibilities.


Wednesday, August 28, 2024

BOO Halloween Sign DIY

It's not Halloween yet, but now's the time to start crafting so everything will be ready for your October decorating. We made a spooky sign out of just scrap wood for our first Halloween DIY project of the season.


We started by finding a good background piece, sanding off the rough edges, and painting it black.


Next, we measured our back board and used Lightburn software and our X-tool laser to cut a rectangle the right size for a border. We fit some ghosts and bats onto the same piece of scrap plywood and cut those out too.


Finally, we painted all the pieces and glued them together. 


You could easily buy ready made shapes to make your sign. Cutting your own is fun though, and then you get to choose the size and make laser cut shapes you might not be able to find in a store. (If you don't have a laser, message us from our Etsy shop and we can get some made for you!)


Happy Halloween crafting everyone! 

Monday, August 19, 2024

The Power of "Yet"

The start of school can be intimidating for kids, teachers, and parents. But we don't have to be everything or do everything all at once.


This is where the power of "Yet" comes in. When our youngest came home from her Kindergarten class she taught us about this amazing superpower. 

"Mom, I can't write my name pretty ... yet." "Dad, I don't know everyone's name ... yet."

These were things that were important to her, and we wondered where this positive attitude had come from. So she told us. 

When her teacher saw her and the other children being frustrated, she taught them that they might not be able to do those things yet, but that eventually they would be able to. THE POWER OF YET! It's so simple, but so comforting at the same time.

This Kindergarten teacher changed not only those kids' lives, but ours. She helped us see that we don't need to be perfect or even good at something right away.

So, when your child comes home and says they can't do something or is frustrated, you can explain the power of "Yet."  Or when you try something new and want to give up, you can remember the power of "Yet." 

You might not have any friends ... Yet. You might not be confident at performing in front of a crowd ... Yet. But it will come! Just keep going and practicing, and even if it's seems like progress is slow, that confidence, that skill, those experiences will come if you keep trying and being patient.

Thank you Kindergarten for the power of "Yet."

Wednesday, July 31, 2024

National Friendship Day: How to Be a Good Friend

National Friendship Day may have started as a suggestion from Hallmark, but whether or not you send a card, the first Sunday of August is a special day to recognize friends.


More than 90 percent of Americans say they have at least one close friend (npr.org). And having friends has lots of advantages. Studies say people who spend time with friends live longer, are healthier mentally and physically, and are more successful in their careers. 

Having friends is great, but so is being a friend. If you're looking for ways to be a good friend, "The Ten Action Steps to Becoming a Good Friend" (https://www.scienceofpeople.com/good-friend) is a great place to start looking for ideas.

Our top three suggestions for being a good friend are:

1. Take the Time

Do something fun together. Put the phone down and listen. Help them accomplish a task they need to get done. Do your best to be there for them when they need you. If you don't have a lot of time, think quality, not quantity.

2. Be Trustworthy

Keep confidences. Listen with more love and less judgement. Tell the truth and be loyal. Be supportive and kind.

3. Communicate

If you can't do it in person, now's the time to pick up your phone. Give honest feedback. Let them know they are important through your words and actions. Be a good listener.


Friendship matters. This Friendship Day, try one of our tips and see if it works!